Showing posts with label recipes. Show all posts

Wednesday, December 10, 2008

* Christmas Cookie Exchange *


Jan and Tom are hosting a Christmas Cookie exchange today. To see all of the other recipes, click on the picture above!

One of my all time favorite holiday cookies are these lovely holly leaves and wreaths. I can remember making them with my mom & grandmothers growing up, and they are quick and easy to make now for any holiday get together!

Photobucket
source


1 tsp. vanilla extract
1 stick butter
1 bag sm. marshmallows
4 c. corn flakes
Green food coloring (I also use a little yellow)
Red hots cinnamon candies

Melt marshmallow and butter in large bowl in microwave, stirring occasionally. Add vanilla and food coloring. Gently stir in corn flakes while marshmallow mix is hot. Drop onto greased wax paper. Can be formed into wreaths if you like. Garnish with red hots (the "berries" of the holly leaves).

Photobucket
source


I'm off to find some new fun Christmas cookie recipes to try this season! Hope you enjoy browsing the other blogs as well. Remember you can get to Jan & Tom's place by clicking on the picture at the very top of this post! :)

Thanks for reading!

Friday, December 5, 2008

Jan & Tom's Christmas Cookie Exchange Recipe Swap!


I love Christmas - especially the food, and the decorations, and the gift wrapping, and the shopping, and the lights, okay, I love everything about Christmas!

Next Wednesday, December 10, 2008, Jan is hosting a Christmas Cookie recipe swap! I will be linking up, and I am looking forward to a myriad of new recipes to try out this season :)

Saturday, September 27, 2008

Autumn Recipes & Tablescapes


Heidi is hosting this fabulous Autumn event today, and I absolutely adore anything autumn-y, so, of course I had to participate!!! The recipe I'm sharing today is from my Aunt Geri, who is a phenomenal chef, and who always has the best presentation! Presentation is everything, you know, and she is tremendously hospitable so she has a lot of opportunity to cook for others, and always makes a huge breakfast for Austin and I to enjoy with her whenever we go to Colorado! :) (Love you Aunt Ger!)
Photobucket


Sweet Potato Casserole
3 cups of cooked, drained and then mashed sweet potatoes
1 c. sugar
2 eggs
1/2 c. softened butter or margarine
1 tsp. vanilla
1/3 c. milk

Mix all of the above ingredients together. Put mixture in a greased 9x13 baking dish. In a separate bowl combine 1 c. light brown sugar
1/2 c. flour
1/3 c. softened butter
1 c. chopped pecans
Mix these ingredients together. Sprinkle on top of potato mixture. Bake 25 minutes or until set in a 350 degree oven.

PhotobucketI was so excited about this event because I had $100 in gift certificates (wedding gift) to a local home decor store that expired on Sunday 9/21, so it was the perfect reason to by some beautiful fall decorations, so most of the elements of this centerpiece are from that, the candle holders were a wedding gift, and the star I won in a blog giveaway from Linda! :) The stars (set of 3 - large, medium, & small) will eventually be hung on our dining room wall when everything is done, but for now the small one is a pretty touch for my autumn centerpiece!

Photobucket


Thanks for reading!

Daring Bakers September Challenge ~ Lavash & Creamy Pumpkin Dip


This month I participated in my very first **trumpet fanfare** Daring Baker's Challenge **trumpet fanfare**. I signed up in time to participate in August, but August was crazy busy, and I think I kind of chickened out, maybe that means I'm not all that daring. But I'm doing this because it is something that is out of my comfort zone (I am a definite novice in the kitchen, but I would love to be a fabulous chef, baker, cook, etc.).

This month's challenge, hosted by Shel (Musings from the Fishbowl) and Natalie (Gluten A Go Go), was to make Lavash and a vegan dip or spread to go with it.

I have been loving the onset of autumn, so I chose to make my Lavash with nutmeg and cinnamon as my spice topping and serve them with a creamy pumpkin dip (the original recipe on the pumpkin dip called for cream cheese, but since the challenge was to make it vegan, I substituted Tofutti's Better Than Cream Cheese).

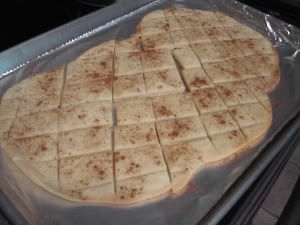
My dough all rolled out and scored
Photobucket


Photobucket Fresh out of the oven.

Lavash Crackers from Peter Reinhart’s The Bread Baker’s Apprentice
Makes 1 sheet pan of crackers

* 1 1/2 cups (6.75 oz) unbleached bread flour or gluten free flour blend (If you use a blend without xanthan gum, add 1 tsp xanthan or guar gum to the recipe* 1/2 tsp (.13 oz) salt
* 1/2 tsp (.055 oz) instant yeast
* 1 Tb (.75 oz) agave syrup or sugar
* 1 Tb (.5 oz) vegetable oil
* 1/3 to 1/2 cup + 2 Tb (3 to 4 oz) water, at room temperature
* Poppy seeds, sesame seeds, paprika, cumin seeds, caraway seeds, or kosher salt for toppings

1. In a mixing bowl, stir together the flour, salt yeast, agave, oil, and just enough water to bring everything together into a ball. You may not need the full 1/2 cup + 2 Tb of water, but be prepared to use it all if needed.

2. For Non Gluten Free Cracker Dough: Sprinkle some flour on the counter and transfer the dough to the counter. Knead for about 10 minutes, or until the ingredients are evenly distributed. The dough should pass the windowpane test (see http://www.wikihow.com/Determine-if-Bre … ong-Enough for a description of this) and register 77 degrees to 81 degrees Fahrenheit. The dough should be firmer than French bread dough, but not quite as firm as bagel dough (what I call medium-firm dough), satiny to the touch, not tacky, and supple enough to stretch when pulled. Lightly oil a bowl and transfer the dough to the bowl, rolling it around to coat it with oil. Cover the bowl with plastic wrap.

or

2. For Gluten Free Cracker Dough: The dough should be firmer than French bread dough, but not quite as firm as bagel dough (what I call medium-firm dough), and slightly tacky. Lightly oil a bowl and transfer the dough to the bowl, rolling it around to coat it with oil. Cover the bowl with plastic wrap.

3. Ferment at room temperature for 90 minutes, or until the dough doubles in size. (You can also retard the dough overnight in the refrigerator immediately after kneading or mixing).

4. For Non Gluten Free Cracker Dough: Mist the counter lightly with spray oil and transfer the dough to the counter. Press the dough into a square with your hand and dust the top of the dough lightly with flour. Roll it out with a rolling pin into a paper thin sheet about 15 inches by 12 inches. You may have to stop from time to time so that the gluten can relax. At these times, lift the dough from the counter and wave it a little, and then lay it back down. Cover it with a towel or plastic wrap while it relaxes. When it is the desired thinness, let the dough relax for 5 minutes. Line a sheet pan with baking parchment. Carefully lift the sheet of dough and lay it on the parchment. If it overlaps the edge of the pan, snip off the excess with scissors.

or

4. For Gluten Free Cracker Dough: Lay out two sheets of parchment paper. Divide the cracker dough in half and then sandwich the dough between the two sheets of parchment. Roll out the dough until it is a paper thin sheet about 15 inches by 12 inches. Slowly peel away the top layer of parchment paper. Then set the bottom layer of parchment paper with the cracker dough on it onto a baking sheet.

5. Preheat the oven to 350 degrees Fahrenheit with the oven rack on the middle shelf. Mist the top of the dough with water and sprinkle a covering of seeds or spices on the dough (such as alternating rows of poppy seeds, sesame seeds, paprika, cumin seeds, caraway seeds, kosher or pretzel salt, etc.) Be careful with spices and salt - a little goes a long way. If you want to precut the cracker, use a pizza cutter (rolling blade) and cut diamonds or rectangles in the dough. You do not need to separate the pieces, as they will snap apart after baking. If you want to make shards, bake the sheet of dough without cutting it first.

5. Bake for 15 to 20 minutes, or until the crackers begin to brown evenly across the top (the time will depend on how thinly and evenly you rolled the dough).

6. When the crackers are baked, remove the pan from the oven and let them cool in the pan for about 10 minutes. You can then snap them apart or snap off shards and serve.

Photobucket

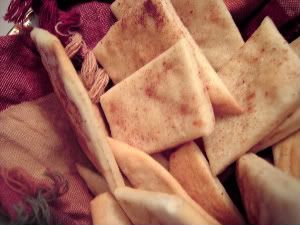
The finished product.


The next time I make these I will most definitely roll the dough out thinner, but these were very tasty!

Pumpkin Dip

1 (8 ounce) package Tofutti's Better Than Cream Cheese, softened
2 cups confectioners' sugar
1 (15 ounce) can solid pack pumpkin
1 tablespoon ground cinnamon
1 tablespoon pumpkin pie spice
1 teaspoon frozen orange juice concentrate

In a medium bowl, blend cream cheese and confectioners' sugar until smooth. Gradually mix in the pumpkin. Stir in the cinnamon, pumpkin pie spice, and orange juice until smooth and well blended. Chill until serving.

Thanks for reading! To hear about more Daring Bakers' experiences, or to find out how to join, visit the Daring Bakers Blogroll.

Friday, September 26, 2008

Pumpkin Potpourri Week!!!

I'm a little late getting to this, but I absolutely had to participate because I love fall, and I love pumpkins, and I have the most fabulous, easy recipe to go with today's pumpkin+chocolate phenomena!!! :)


Lisa over at Stop and Smell the Chocolates has been hosting Pumpkin Potpourri Week since Monday, and since I've been M.I.A. most of this week, I almost totally missed it! (Thanks for the heads up Sarah Mae!)

My favorite Pumpkin/Chocolate recipe has been in our family for as long as I can remember, and my mom and dad still make them every time we're in town (even in the middle of the spring and summer)!

Pumpkin Chocolate Chip Cookies (We always just call them pumpkin cookies.)

1 cup canned pumpkin
1 cup white sugar
1/2 cup vegetable oil
1 egg
2 cups all-purpose flour
2 teaspoons baking powder
2 teaspoons ground cinnamon
1/2 teaspoon salt
1 teaspoon baking soda
1 teaspoon milk
1 tablespoon vanilla extract
2 cups semisweet chocolate chips

Combine pumpkin, sugar, vegetable oil, and egg. In a separate bowl, stir together flour, baking powder, ground cinnamon, and salt. Dissolve the baking soda with the milk and stir in. Add flour mixture to pumpkin mixture and mix well. Add vanilla and chocolate chips. Drop by spoonful on greased cookie sheet and bake at 350 degrees F for approximately 10 minutes or until lightly brown and firm.

I don't have any pics mostly because they're usually not around long enough to take a picture before they are devoured.

Thanks for reading! Be sure to head on over to Lisa's to check out all of the other fantabulouse pumpkin & chocolate combos! I've got my eye on the tiramisu!

Tuesday, July 8, 2008

Tea Party!!!

Today Jan & Tom are hosting a blog tea party! Hello to all of our tea party guests!


I love tea parties! I always have ever since I was a little girl, and my mom would pulled out the fancy cups and saucers for the very first time and taught my sister and I to drink with dainty little sips while holding our pinkies in the air! My mom had a beautiful collection of tea cups, and every so often my dad would add to it, or she would pick one up at a vacation destination. Both of my grandmothers and both great-grandmothers that I can remember meeting also had their own collections of the beautiful china cups and saucers.


The cup at the top of this post belonged to my great-grandmother Hilderbrand. (She was my father's mother's mother.) After she passed away each of the granddaughters and great-granddaughters got to select a cup from her vast collection. I drank my tea out of that cup this morning to get myself into the tea party spirit.


Please forgive my poor photography skills, but this beautiful little cup belonged to my grandmother on my father's side. She was a very dear lady, and she used to watch my sisters and I often while my parents were away. She even lived with our family a couple of different times throughout my growing up years. She was very good at making you feel special. After I got my driver's license I would drive over to her apartment after school and she would have a sweet little spread all set up for us to enjoy together. She passed away a month before I graduated from high school, and had set aside a teacup for each of her granddaughters to be given to us on the occasion of our weddings. When we were opening presents the morning after our wedding, I was surprised to find a small square box with one of Grandma's handmade cards attached. On the card, my dad had written an explanation of the gift which was this beautiful teacup and one of grandma's lace hankerchiefs. Both are displayed on our corner shelf in the kitchen.

Grandma Faulkner

My favorite treats that she used to make are called "Buttons & Bow Knots"

(This recipe card was included in a book of family recipes that my parents gave to us for our wedding :) )

Just a quick little explanation of this recipe. First, the dough will be very, very sticky, so I use a TON of flour when I'm rolling them out. And second, you cut it with a donut cutter, so you get a ring and a "donut hole." Bake the holes as is - these are the "buttons" - and twist the rings so they look like a figure eight - "bowknots." Also, be very liberal with the melted butter and sugar when you're coating them! (The best part is the absolute lack of any nutritional value whatsoever!) I'm sorry I don't have any pictures of what these little beauties look like, but they're fabulous! If you try them, let me know what you think!

Be sure to visit Jan & Tom's Place to check out all of the other tea parties going on in blogland today!


Thanks for reading!